This section of the manual gives a step by step guides for using LandscapePro.
Author: Ade
Plug-in Mode
Using the LandscapePro Plug-in
Studio & Studio Max Editions Only
The Studio edition of LandscapePro can enter a “plug-in mode”. This is intended for use when LandscapePro has been launched by another application (such as Photoshop) to enhance an image that is being managed by the other application. LandscapePro then behaves like a plug-in to the other application.
After the plug-in has been successfully installed as outlined in the Plug-in Installation Guide, you will be able to use LandscapePro as a plug-in in any of the supported photo editing applications.
When LandscapePro is run as a plug-in from another application, the image or layer in the other application will automatically be loaded into LandscapePro where you can enhance the image in the usual way. Once you are happy with your results, press the Save and Close button on the toolbar. This will close LandscapePro and return the enhanced image to the original application.
Using LandscapePro from Photoshop
When the plug-in has been installed, LandscapePro will appear as a filter in Photoshop. In the Photoshop Filter menu, you will find a sub-menu called Anthropics, and in that you will find LandscapePro.
The LandscapePro filter works like other Photoshop filters in that it is applied to the current selection (or the whole area if there is no selection) on the current layer. When you select the filter, the image being filtered will automatically be opened in LandscapePro.
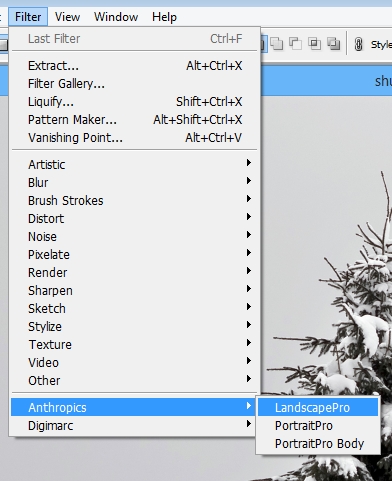
Plug-in Location: Filter> Anthropics> LandscapePro
Enhance Image
After you have opened an image and the areas have been identified, the horizon has been adjusted if required, then you are ready to start enhancing the image.
Viewing the result
You can always flip the enhanced (“after”) image back to the original (“before”) image to see the changes by pressing and holding the Enter key, or by pressing the Original button at the top of the controls panel.

Important things to check
You can always go back to the Add & Edit Areas by clicking on the section again.
Changing the result
When you first begin editing, there are no adjustments made to your image.
You can change how the image is enhanced by moving the sliders in each section on the Side panel.
The sliders are grouped into sections that control various aspects of the image. When you first enter this stage, all sections are closed. Sections can be opened or closed by clicking on their title button.
In every section there are a set of presets which will set some or all of the sliders to pre-defined values to get a particular effect. You can go through these to see some of the types of enhancement possible for your photo.
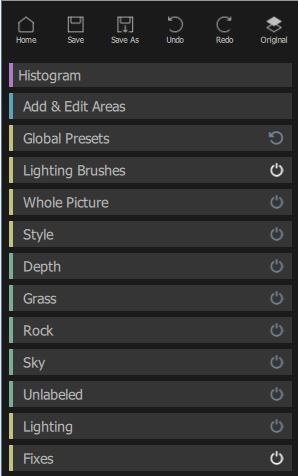
Controls panel
Some or all of the labels will appear in the controls panel, depending on what areas have been added in the identifying areas process.
Saving the result
The Save button at the top of the control panel lets you save the image and choose the name and file type to save it as.
If you would like to save all the settings so that you can reload your image and continue adjusting the sliders, select to save the image as a .lp2 image. This saves the original image, all the area selections, and all the sliders values into a proprietary “.lp2” file.
LandscapePro Editions
Click to buy or upgrade to higher editions of LandscapePro.
LandscapePro comes in three editions, Standard, Studio, and Studio Max. The Standard edition is intended for more casual users or amateur photographers. The Studio and Studio Max editions are intended for enthusiast or professional users.
This manual covers all editions, with features that are only available in some editions indicated.
The following table shows the main features of LandscapePro, and which editions they are in.
| Standard | Studio | Studio Max | |
| ✔ | ✔ | ✔ | Intelligent editing for landscapes |
| ✔ | ✔ | ✔ | Automatic area selection |
| ✔ | ✔ | ✔ | Unique controls that adapt to your photo |
| ✔ | ✔ | ✔ | Picture controls |
| ✔ | ✔ | ✔ | Free online support |
| ✔ | ✔ | ✔ | Read and write JPEG and TIFF format images |
| ✔ | ✔ | ✔ | 64 bit has no limit on image size |
| ✔ | ✔ | ✔ | Works standalone |
| ✔ | ✔ | Read camera RAW and Adobe DNG format | |
| ✔ | ✔ | Read & write TIFFs containing 16 bits per color sample | |
| ✔ | ✔ | Supports conversion between different color spaces | |
| ✔ | ✔ | Supports setting monitor and working color spaces | |
| ✔ | ✔ | Support for JPEG and TIFF embedded color profiles | |
| ✔ | ✔ | Available as a Photoshop plug-in | |
| ✔ | ✔ | Available as a Photoshop Elements plug-in | |
| ✔ | ✔ | Available as a Lightroom plug-in | |
| ✔ | Fast switching between batches of images | ||
| ✔ | Histogram Visualisation |
Getting Started
Introduction
LandscapePro is the easiest and fastest way to re-touch landscape photos, allowing you to achieve professional results in minutes.
With intelligent controls that adapt to the features in your photo, LandscapePro allows you to get dramatic results with your landscapes.
The software will guide you through the process of enhancing a landscape photo and is designed to be easy to pick up, with instructions appearing in green boxes when relevant to you. Most users should be able to use the software without ever requiring this manual. If you prefer to watch demonstrations of how to use the software, take a look at the online Video Tutorials. Also, for answers to technical questions there is also an online FAQ.
LandscapePro is available in three editions, Standard, Studio and Studio Max. All three editions are covered by this manual.
LandscapePro is available for Windows and Mac computers.
Getting Started
Take a look at the Quick Start Guide to see a quick overview of how to use LandscapePro.
The Step By Step Guide provides more detailed information about each step.
If you need further help, please visit www.landscapepro.pics/support where you see the latest FAQ, and access our support ticket system. The support ticket system lets you send a question to our support staff. Create a support ticket, and log back in to see your reply.
General Settings
To bring up this dialog, return to the Home screen and click the Settings button in the top left hand corner.
The settings available under the General tab are:
Show tips as you use LandscapePro
Unchecking the box turns off the tips, so you will no longer be prompted with tips on how to use LandscapePro.
Load 16 bit images as 8 bit then reprocess as 16 bit on Save ( Off: Slow)
Checking the box will save you some time on loading images if you only have small adjustments to make to your images.
Auto Plugin Mode
If this is checked, LandscapePro will enter plug-in mode if a path is specified on the command line when launching the application.
Check the box to use the Studio version as a Plugin. Uncheck the box if you regularly open images directly in LandscapePro.
Send anonymous usage data to improve LandscapePro
Allow your software to collect data anonymously and send it to Anthropics to help improve the software.
Jpeg Compression Setting. Higher is better quality.
Adjust the amount of compression when saving a jpg image. Smaller values produce smaller files, higher values produce larger, but better looking files.
Maximum image display size
If you have problems loading very large images into the software, they might be too large for your graphics card to display. If that’s the case you can lower this value. It will only affect what you see in the software, images will still be saved at the original size.
Add & Edit Areas
Adding Areas
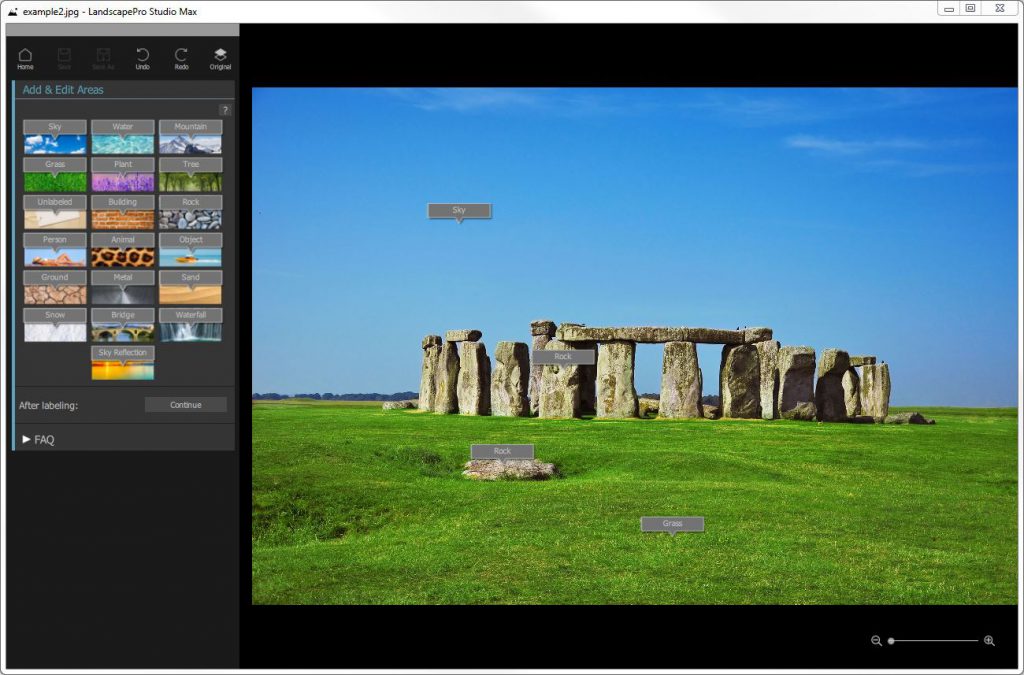
After opening an image you can label different areas of the image such as Sky and Rock by dragging the labels from the left hand side of the screen onto the image.
Editing Areas
When you have finished labeling areas, press continue and the areas you have chosen will be expanded automatically and highlighted in different colors. These areas can be edited by clicking the mouse and dragging the regions. Try it to see how this works. You don’t need to be too accurate, and you can always come back to this stage later if needed.
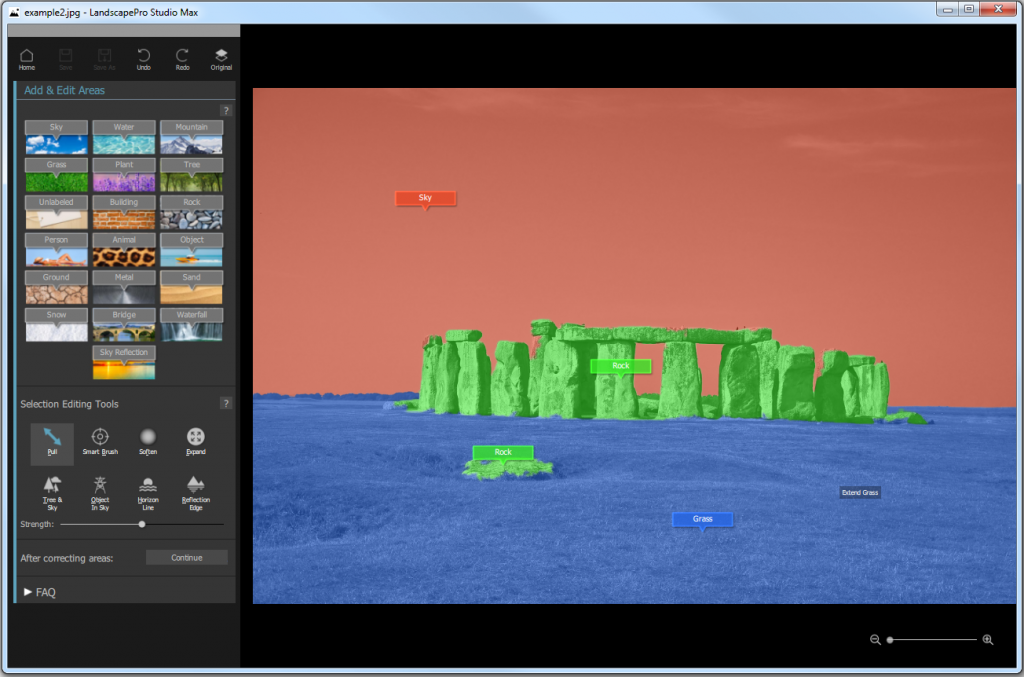
Choose different Selection Editing Tools to correct the labelled areas.
Press Continue when finished.
Adjust Horizon
The next stage is to adjust the horizon in the image by clicking and moving the mouse up and down. If there is no horizon this step can be ignored. Press Continue to move on to Enhance Image.
Open An Image
The LandscapePro Home screen
When you run LandscapePro, the first thing you see is the Home screen.
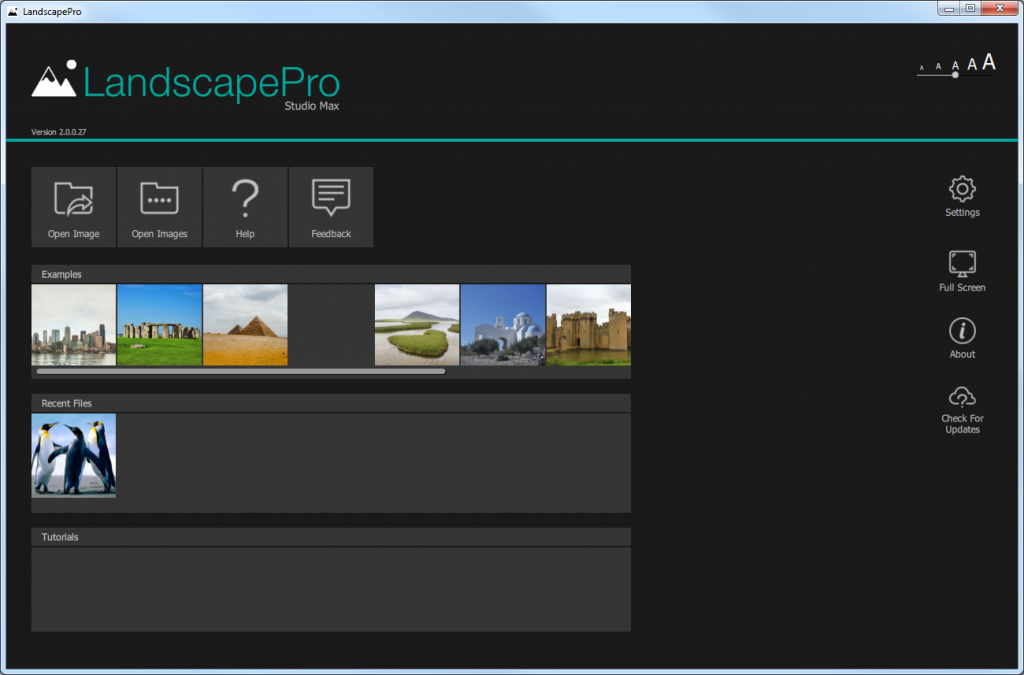
On the Home screen you will see buttons to Open an Image or a Batch (Studio Max only) and buttons to get Help or give Feedback.
Below this you will find Examples you can work with and some short Tutorial videos to watch. If you’ve already edited an image with LandscapePro 3, you’ll also see your Recent Files.
Open a single image
To begin working on a landscape image, click on the Open Image button. The Open Image window will open; browse to the image you want to work on and select it.
Image types
LandscapePro Standard supports JPEGs, and TIFFs with 8 or 16 bits per color sample (24 or 48 bits per pixel). It can load in all of these formats and will always save in 8 bits per color sample.
LandscapePro Studio and Studio Max editions also support reading most camera RAW file types. They will save tiff files with the same number of bits as the original file.
Top Tips For Best Results
If you just read one page in this manual, make it this one. Here are some tips to get the best results out of LandscapePro.
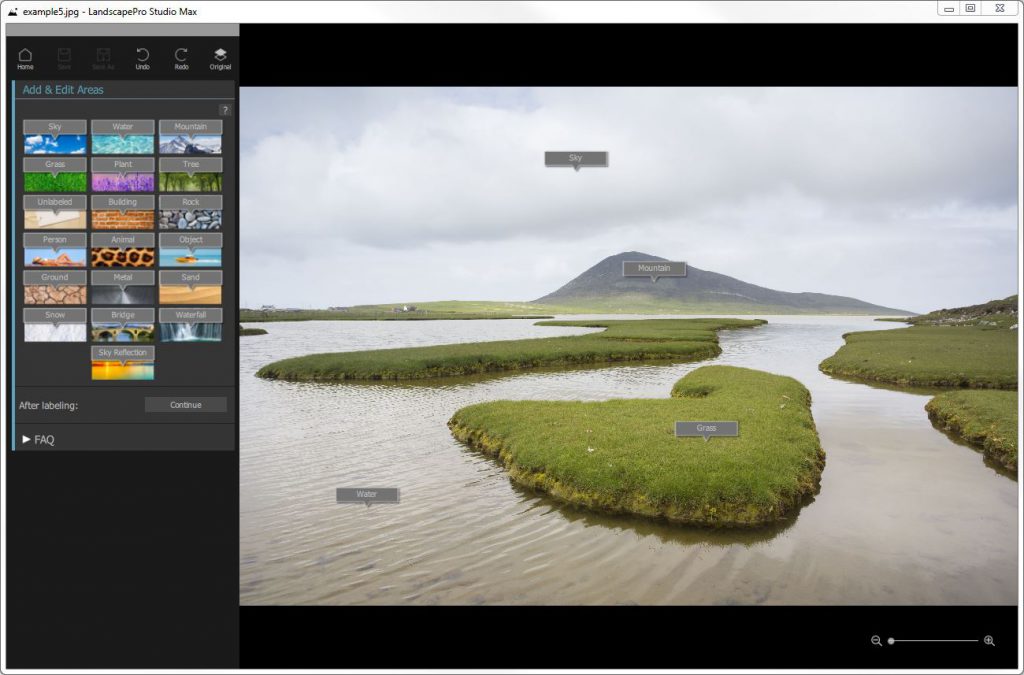
Only add necessary labels
LandscapePro uses targeted editing to provide you with the best tools for each feature in your landscape. However, it’s rarely necessary to label everything in your image. You only need to label something if:
+ You want to adjust it separately from the rest of the scene
+ It is large and you want to use the depth map
All pixels that are not labeled can be adjusted using the sliders in the Unlabeled section, to get them to match the edits that you may have set in the other sections.
Adjust the selections where necessary
Areas need to be accurately defined if you are making dramatic changes to them, for instance replacing a sky. For subtle changes, not getting the edge precisely will be much less noticeable.
It is best to roughly make your selections and return to the Add & Edit Areas selection later if necessary.
Don’t push the sliders up too far
Often, you can greatly improve a picture with fairly subtle changes. Push the sliders up just far enough to get the results you want. If you go too far, the result can look unnatural or faked.
If you are making more dramatic changes to your image you will need to spend more time defining the areas.
Depth map
LandscapePro uses your areas to calculate a depth map. The depth map is used for Lighting, Depth Of Field and Depth sections. To get these sections working as well as possible, tall objects should be labeled. LandscapePro uses where you placed the horizon line to work out which objects are tall by looking at which go above the horizon. If you are looking down on a scene, placing the horizon line lower than it should be can get better results because tall objects might not reach the horizon in the image.
Cloud replacements
Replacing skies requires an accurate sky selection. Many of the selection editing tools (such as the Tree & Sky brush) can be used to improve the selection. In addition, the Sky Edge slider in the Sky section can be used to nudge the sky selection edge.
The bottom of the sky area is used to work out where the bottom of the replacement clouds should be. If you find that the clouds on the horizon are too large, it’s possible there are some pixels of sky selected lower down. Open the Add & Edit Areas section to check.
Adjustment order
The adjustments in the Side Panel are applied to your image from bottom to top as in Photoshop (i.e. Whole Picture is the last to be applied). Some of the sliders, particularly the style sliders at the top of each section, can react differently depending on what happens lower down the chain, which means some sliders can occasionally have unexpected results when style sliders are active in sections further up.
If you find that the sliders are too slow, try temporarily turning off adjustments above the ones you are working on.
Session files
If you want to return to the editing process later and reload your image and continue adjusting the sliders, you will need to save a Session file. In LandscapePro this is a .lp2 file. This saves the original image, all of the area selections, and all of the sliders values into a proprietary “.lp2” file. These .lp2 files can only be opened in LandscapePro.
Quick Start Guide
When you open LandscapePro, you will see the Home screen.
To begin working on an image, click on the Open Image button. This will let you browse to the image you want to work on. Alternatively, drag an image onto LandscapePro or use the Open With… command from your computer’s file browser.
Label the image
First, drag the labels from the sidebar on to different parts of the image. For example drag the Sky label to any sky you see in the image.
After pressing Continue, areas of the image will be automatically selected. You can adjust the selection using the Selection Editing Tools .
After pressing Continue again you have the option to adjust the Horizon.
Click Continue once more to access the editing tools.
Tips: Adding labels is optional. Opening an image without labels will give you access to basic editing tools.
Enhancing the image
At the top of the controls panel there are buttons for returning to the Home screen, Save, Undo, Redo, and Show Original.
Underneath these, to the left of your image, you will find the Side Panel with the editing controls.
The controls are:
Add & Edit Areas – used to return to the labelling stage to refine the selections.
Global Presets – presets that affect all of the other sections. For example a Global Preset could change the sky, the lighting and the ground. Global Presets have no sliders of their own as they are just presets to change the rest of the sections.
Lighting Brushes – for manually changing areas of light and shadow using 2D and 3D brushes.
Whole Picture – for making overall picture adjustments such as exposure or contrast.
Style or B&W, Bokeh, Vignette – for adding Vignettes, converting images to Black and White or Sepia, and adjusting Depth of Field.
Depth – for adjusting colors depending on their distance from the camera. For instance you can choose to brighten objects in the mid distance while darkening nearby and far away objects.
Targeted editing – Any labels you applied to your image will appear with their own set of Sliders and Presets. e.g.Water, Mountain, Building, Ground, Grass, Plant, Tree, Object, Person, Animal, Rock, Metal, Sand.
Unlabeled – for making adjustments to any areas that remain unlabeled, i.e. areas that are not colored in the Add & Edit Areas section.
Lighting – for making adjustments to the lighting of the whole image.
Fixes – Sliders to remove noise (speckling) and to straighten the horizon and fix lines that should be vertical.