v3 Selection Editing Tools

The Selection editing tools are available under the Add & Edit Areas section.

LandscapePro offers different editing options for different features in your image. The Selection tools are used to adjust the areas where the enhancements are made.

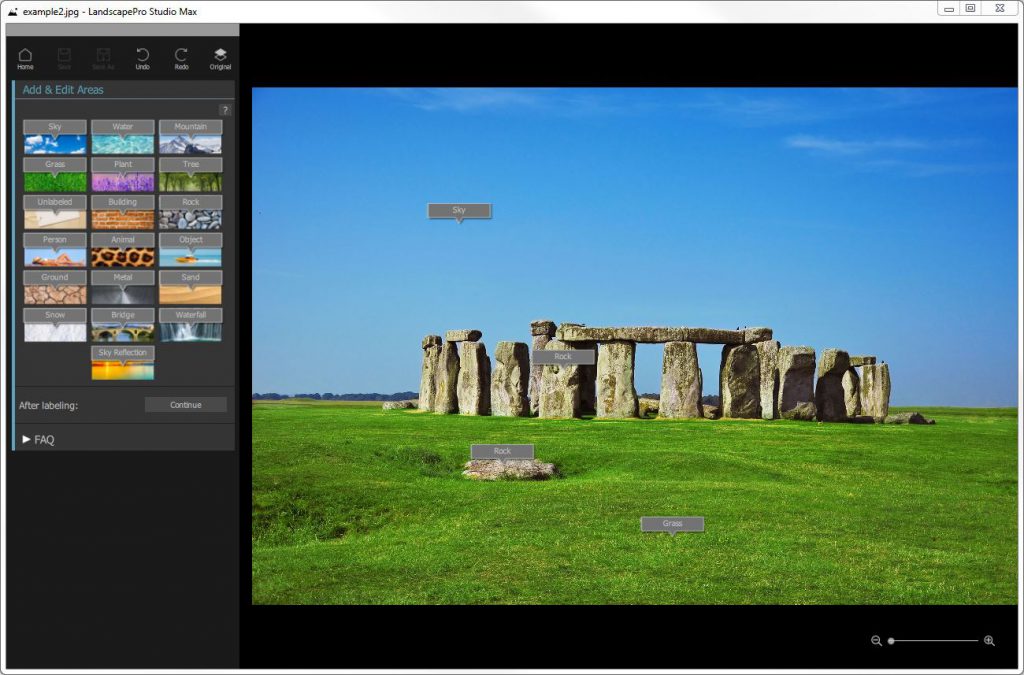
To begin selecting, drag and drop the appropriate labels (Sky, Water, Sand, etc.) onto features in your image. LandscapePro will automatically select the areas that have been labeled but depending on the picture you may want to refine these. The selection editing tools let you manually adjust these areas.

The selection editing tools are “smart” tools, in that they will automatically detect the edges of regions. Read the Pull tool first, it is the default tool and some of the other tools work in a similar way. Understanding each of the tools’ strengths is key to get great results with complex images.

The following tools are available:
Pull
Smart Brush
Soften
Expand
Tree & Sky
Object In Sky
Horizon Line
Reflection Edge

v3 Side Panel Reference

This section describes the main controls available when you are enhancing an image.

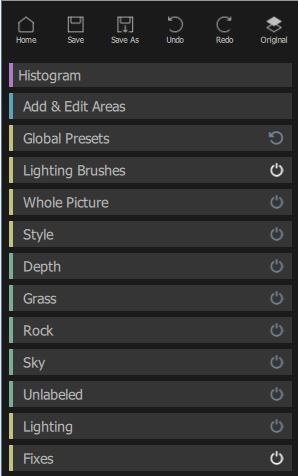
The main sections in the controls panel can be opened or closed by clicking on the header of each section.

Each section has a toggle on the right hand side that resembles a power button that is green when on and grayed out when off. You can click on this button to temporarily disable a section (which will set the sliders to zero) and click again to enable it. If you want to start again with a section, you can turn it off and start adjusting the sliders from that ‘clean state’.

A section is only displayed if it is needed. For example if you have not labelled any buildings in the picture then the Building section will not be shown.

The Histogram is only available in the Studio Max edition and is always shown at the top even if you scroll down the rest of the sections.

Dock and Un-dock the controls

You can un-dock and move the controls by dragging the gray rectangle at the top of the controls. The control panel can then be made longer or shorter by dragging the bottom edge of the control panel. Re-dock the control panel on the left or right by dragging it all the way over to the left or right.  When the panel is un-docked, it will fade out when you use the sliders. That way you can view and edit your image completely full screen with no distracting elements.

Flip between the enhanced and original image

You can press the Enter / Return key at any time to switch the enhanced image view to show the original image. The original image is only shown while you hold down the Enter / Return key.

This lets you flip between the enhanced and original image which is a great way to see the changes.

Alternatively, you can click and hold the mouse button down on the button that says Show Original.

v3 Plug-in Mode

Using the LandscapePro Plug-in

Studio & Studio Max Editions Only

The Studio edition of LandscapePro can enter a “plug-in mode”. This is intended for use when LandscapePro has been launched by another application (such as Photoshop) to enhance an image that is being managed by the other application. LandscapePro then behaves like a plug-in to the other application.

After the plug-in has been successfully installed as outlined in the Plug-in Installation Guide, you will be able to use LandscapePro as a plug-in in any of the supported photo editing applications.

When LandscapePro is run as a plug-in from another application, the image or layer in the other application will automatically be loaded into LandscapePro where you can enhance the image in the usual way. Once you are happy with your results, press the Save and Close button on the toolbar. This will close LandscapePro and return the enhanced image to the original application.

Using LandscapePro from Photoshop

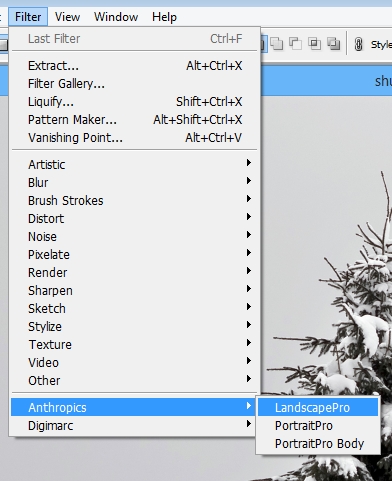
When the plug-in has been installed, LandscapePro will appear as a filter in Photoshop. In the Photoshop Filter menu, you will find a sub-menu called Anthropics, and in that you will find LandscapePro.

The LandscapePro filter works like other Photoshop filters in that it is applied to the current selection (or the whole area if there is no selection) on the current layer. When you select the filter, the image being filtered will automatically be opened in LandscapePro.

LandscapePro 3 can be used as a Smart Filter by applying it to a Photoshop Smart Object.

Plug-in Location: Filter> Anthropics> LandscapePro

v3 Enhance Image

After you have opened and labeled your image, you are ready to start editing.

Viewing the result

You can always flip the enhanced (“after”) image back to the original (“before”) image to see the changes by pressing and holding the Enter key, or by pressing the Original button at the top of the controls panel.

Tip: You can always go back and adjust the selection by clicking on the Add & Edit Areas header again. No Continue button will be displayed this time, you can simply click on another section to continue editing. 

Changing the result

When you first begin editing, there are no adjustments made to your image.

You can change how the image is enhanced by moving the sliders in each section on the Side Panel.

The sliders are grouped into sections that control various aspects of the image. Some or all of the labels will appear in the Side Panel, depending on what areas have been added in the identifying areas process.

When you first enter this stage, all sections are closed. Sections can be opened or closed by clicking on their title button.

In every section there are a set of presets which will set some or all of the sliders to pre-defined values to get a particular effect. You can go through these to see some of the types of enhancement possible for your photo.

Saving the result

The Save button at the top of the control panel lets you save the image and choose the name and file type to save it as.

v3 LandscapePro Editions

Click to buy or upgrade to higher editions of LandscapePro.

LandscapePro comes in three editions, Standard, Studio, and Studio Max. The Standard edition is intended for more casual users or amateur photographers. The Studio and Studio Max editions are intended for enthusiast or professional users.

This manual covers all editions, with features that are only available in some editions indicated.

The following table shows the main features of LandscapePro, and which editions they are in.

Standard Studio Studio Max
Intelligent editing for landscapes
Automatic area selection
Unique controls that adapt to your photo
Picture controls
Free online support
Read and write JPEG and TIFF format images
64 bit has no limit on image size
Works standalone
Read camera RAW and Adobe DNG format
Read & write TIFFs containing 16 bits per color sample
Supports conversion between different color spaces
Supports setting monitor and working color spaces
Support for JPEG and TIFF embedded color profiles
Available as a Photoshop Smart Filter
Available as a Photoshop Elements plug-in
Available as a Lightroom plug-in
Fast switching between batches of images
Histogram Visualisation

v3 Getting Started

Introduction

LandscapePro is the easiest and fastest way to re-touch landscape photos, allowing you to achieve professional results in minutes.

With intelligent controls that adapt to the features in your photo, LandscapePro allows you to get dramatic results with your landscapes.

The software will guide you through the process of enhancing a landscape photo and is designed to be easy to pick up, with instructions appearing in green boxes when relevant to you. Most users should be able to use the software without ever requiring this manual. If you prefer to watch demonstrations of how to use the software, take a look at the online Video Tutorials. For answers to technical questions there is a FAQ along the sidebar.

LandscapePro is available in three editions, Standard, Studio and Studio Max.  All editions are covered by this manual.

LandscapePro is available for Windows and Mac computers.

Getting Started

Take a look at the Quick Start Guide to see a quick overview of how to use LandscapePro.

The Step By Step Guide provides more detailed information about each step.

If you need further help, the support ticket system lets you send questions to our support staff.

General Settings

To bring up this dialog, return to the Home screen and click the Settings button in the top left hand corner.

The settings available under the General tab are:

Show tips as you use LandscapePro

Un-checking the box turns off the tips, so you will no longer be prompted with tips on how to use LandscapePro.

Load 16 bit images as 8 bit then reprocess as 16 bit on Save ( Off: Slow)

Checking the box will save you some time on loading images if you only have small adjustments to make to your images.

Auto Plugin Mode

If this is checked, LandscapePro will enter plug-in mode if a path is specified on the command line when launching the application.

Check the box to use the Studio version as a Plugin. Un-check the box if you regularly open images directly in LandscapePro.

Send anonymous usage data to improve LandscapePro

Allow your software to collect data anonymously and send it to Anthropics to help improve the software.

Jpeg Compression Setting. 

Adjust the amount of compression when saving a jpg file. Higher is better. Smaller values produce smaller files, higher values produce larger, but better looking files.

Maximum image display size

If you have problems loading very large images into the software, they might be too large for your graphics card to display. If that’s the case you can lower this value. It will only affect what you see in the software, images will still be saved at the original size.

v3 Add & Edit Areas

Adding Areas

After opening an image you can label different areas of the image – such as Sky or Rock – by dragging the labels from the left hand side of the screen onto the image.

Editing Areas

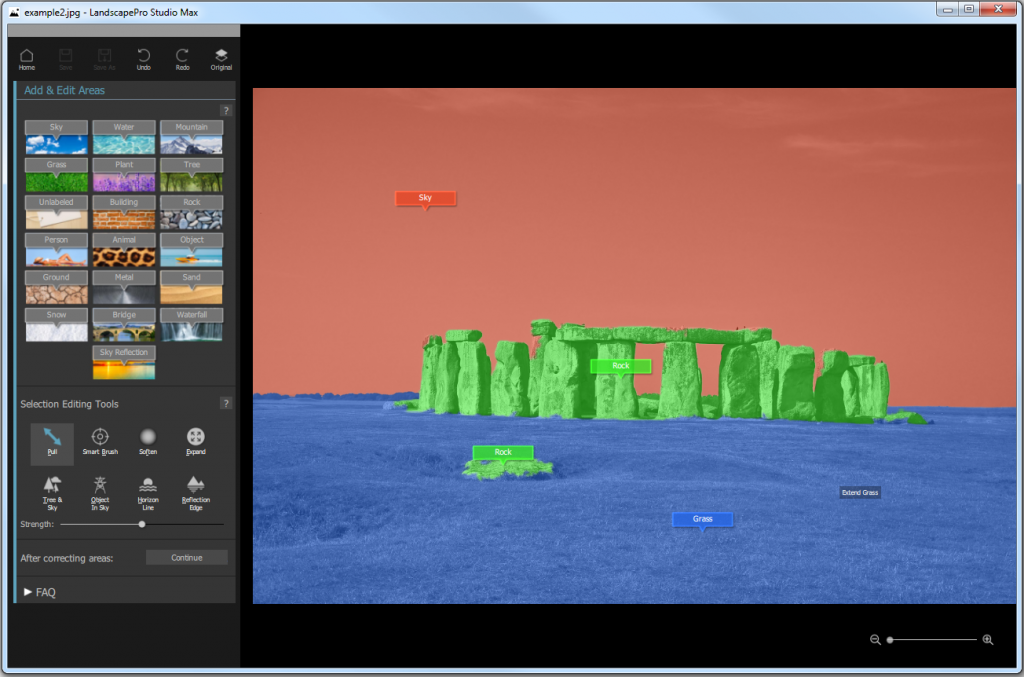
When you have finished labeling areas, press continue and the areas you have chosen will be expanded automatically and highlighted in different colors. These areas can be edited by clicking the mouse and dragging the regions. Try it to see how this works. You don’t need to be too accurate, and you can always come back to this stage later if needed.

Choose different Selection Editing Tools to correct the labelled areas.

Press Continue when finished.

Adjust Horizon

The next stage is to adjust the horizon in the image by clicking and moving the mouse up and down. If there is no horizon this step can be ignored. Press Continue to move on to Enhance Image.

Adjusting the Selections

Once you’ve started editing, you may find you want to adjust the area selection. Simply click Add & Edit Areas in the left hand menu bar to open the labelling stage again. When you’ve finished making adjustments, click on one of the other editing headers in the menu (e.g. Water or Sky) to return to your editing.