Fixes


De-Noise – Reduces the graininess in your image often caused by lower quality images, or too high ISO being used.

Straighten –  On opening the Fixes menu you will see lines on your image marking the horizontal and vertical lines. Adjust these to match your image.  When the Straighten button is switched on, the lines will move to line up both lines in your image, so horizons become level, and buildings become straight.

Lighting

When the Lighting section is opened and the Strength is not 0, there are two extra tools that open on the image.

One is the directional light and this is shown by a Sun shape which can be dragged around the image to adjust the direction of the light.

The other works like the extend areas tool and appears like a hand drawn arrow, and will drag the light from the place where you first click, across the area where you then drag the tool.

This is to help make the areas of lighting the same where they should be the same, for instance, on one surface at the same angle.

The lighting section contains a tab with Presets and a tab with sliders.

Adjusting the Strength slider opens up the other options.

The options are:

Lighting color

Shadows – Opens up the blocks of colors for the shadows and the sliders to adjust to exactly the color that you want.

Highlights – Opens up the blocks of colors for the Highlights and the sliders to adjust to exactly the color that you want.

Cloud Shadows

Cloud shadows are shadows cast by the sun onto the ground. These can be used to make a flat landscape more interesting.

Shadow Type – Adrop down to select different patterns of clouds to cast onto the ground.

Shadow scale – Allows you to increase or decrease the amount of shadows cast onto the ground. When it is 0, then this has no effect.

Angle – Rotate the shadows cast onto the ground.

Buildings

This section only appears when you have dragged a building label onto the picture.

Relight as facade – Button to adjust the lighting so that all buildings are lit as if theywere vertical flat planes. Turn on or off.

Soften Lighting

This gives you a slider for each section that decreases the lighting in each of the areas.

Lighting Texture

This gives you a slider for each section that allows you to change the roughness of each area. Rougher areas will bring out more texture, especially when the light is glancing.

Reset Section and Save Sliders

At the bottom of each section are the buttons for Reset Section, and Save Preset.

Save a preset for future use by clicking Save Preset. This opens a box to type a preset name. Click OK to save it as a Preset in that section. Click Cancel to exit the Save Preset box.

Click Reset Section to revert all slider values to 0, undoing all of your changes to that section.

Tip: Toggling the power symbol to the right of a section heading lets you turn your changes on and off without permanently undoing them. This is useful if you want to review your edits.
Sky

When you have dropped a sky label into your picture, a Sky section will appear to let you edit the pixels marked sky.

Replacing Sky Overview

Editing Sky Overview

Sky Reflections

When you use the label Sky Reflections to mark out areas of water that reflect the sky, any changes to your sky will automatically be shown in the water too.  Roughly mark the sky reflections, then use the Reflection Edge tool to refine the edge between reflections and the rest of the water.

Detailed Description

Separate clouds from atmosphere

LandscapePro allows you to edit the sky in two different modes: either as a whole or by separating the clouds from the atmosphere. If this option is turned on, LandscapePro will try and separate the clouds from the blue behind them and allow you to edit them separately.

When Separate clouds from atmosphere is OFF

Sky
The sky controls are visible if you have turned off Separate clouds from atmosphere.

Copy to Image – Ensures any change you make to the colors of the sky is reflected in the rest of the picture. This is important because the sky is the light source for the scene and if they don’t match, then the sky can look
fake.

Sky Edge – Expand or contract the edge of the sky selection. This is especially important if you have made dramatic changes to the sky.  Zoom in to the image to see the effect.

Dehaze – Adds or removes the amount of haze appearing in the atmosphere from the sky.

Replace with – Replaces the sky with a new picture. In this mode the entire sky is replaced with a new picture. You can press “Add..” to add your own sky.

Sky Colors

Top (style) slider – This offers a choice of different sky color and contrast styles by clicking on the drop down box. The slider increases or decreases the effect.

Style Contrast – When turned up to 1, the brightness and contrast of each pixel in the sky is changed to reflect the style. When at 0 only the color of the pixels changes.

Exposure – Adjusts the Exposure of the sky and the clouds.

Contrast – Adjusts the Contrast of the sky and the clouds.

When Separate clouds from atmosphere is ON

Atmosphere
The atmosphere controls are visible if you have turned on Separate clouds from atmosphere. They allow you to edit the atmosphere behind the clouds. As the clouds are generally see through you will often be able to see the change in atmosphere through the clouds.

Copy to Image – Ensures any change you make to the colors of the sky is reflected in the rest of the picture. This is important because the sky is the light source for the scene and if they don’t match, then the sky can look fake.

Exposure – Adjusts the Exposure of the atmosphere.

Temperature – Sliding to the right warms the atmosphere, making it more red, sliding to the left cools the atmosphere making it bluer.

Tint – Adjusts the tint of the atmosphere. Sliding to the right makes it greener, to the left, more magenta..

Sky Edge – Expand or contract the edge of the sky selection. This is especially important if you have made dramatic changes to the sky. Zoom in to the image to see the effect.

Dehaze – Adds or removes the amount of haze appearing in the atmosphere from the sky.

Clouds

Replace with – Allows you to replace the clouds in the sky while keeping the atmosphere fixed. It does this by separating the clouds from the sky and applying the separated clouds to your atmosphere. If this doesn’t work, try turning off Separate clouds from atmosphere. You can press “Add…” to add your own.

Cloud Density – Slider allows you to adjust the density of the clouds. Increasing it makes the clouds more opaque. This can be a good way to get better contrast between the clouds and atmosphere.

Clouds Colors

Top (style) slider – Separately changes the colors of the clouds. – Slider adjusts the amount of change in the color.

Style Contrast – When turned up to 1, the brightness and contrast of each pixel in the clouds are changed to reflect the style. When at 0 only the color of the pixels changes.

Exposure – Adjusts the exposure of the clouds.

Contrast – Adjusts the contrast of the clouds.

Tip: To remove a sky that you have added to LandscapePro, delete it from Cloud Replacements folder.

On Windows you can find this at –
C:\ProgramData\Anthropics\LandscapePro\CloudReplacements

On Mac you can find this at –
Library/ApplicationSupport/Anthropics/LandscapePro/CloudReplacements

Reset Section and Save Preset

At the bottom of each section are the buttons for Reset Section and Save Preset.

Save a preset for future use by clicking Save Preset. This opens a box to type a preset name. Click OK to save it as a Preset in that section. Click Cancel to exit the Save Preset box.

Click Reset Section to revert all slider values to 0, undoing all of your changes to that section.

Tip: Toggling the power symbol to the right of a section heading lets you turn your changes on and off without permanently undoing them. This is useful if you want to review your edits.

Depth

Shows a tab for Presets of changes made to the whole picture, and a tab for adjusting sliders that adjust the whole picture.

Opacity – adjusts how much the sliders affect the image. When the opacity is 0 there is no effect and the rest of the controls are hidden.

Mid Distance Slider – Adjusts where the Mid Distance applies.

Near – Blocks of color to adjust the color of the near ground in the image. When a block is selected, additional sliders appear to adjust the exact color selected.

Mid – Blocks of color to adjust the color of the mid ground in the image. When a block is selected, additional sliders appear to adjust the exact color selected.

Far – Blocks of color to adjust the color of the far ground in the image. When a block is selected, additional sliders appear to adjust the exact color selected.

Reset Section and Save Sliders

At the bottom of each section are the buttons for Reset Section, and Save Preset.

Save a preset for future use by clicking Save Preset. This opens a box to type a preset name. Click OK to save it as a Preset in that section. Click Cancel to exit the Save Preset box.

Click Reset Section to revert all slider values to 0, undoing all of your changes to that section.
Tip: Toggling the power symbol to the right of a section heading lets you turn your changes on and off without permanently undoing them. This is useful if you want to review your edits.

Style

Contains a tab with Presets and a tab with sliders.

Depth of Field

Radius – Adjusts the radius of the defocusing affect. Larger values blur more. When the radius is at 0, there is no effect and the other sliders are hidden.

Focus Distance – Sets the distance at which the image appears focused – Near ground, mid ground or far ground.

Sharp Range – Adjusts how far away from the Focus Distance areas become blurry.

Black & White and Sepia

Opacity – Increases the strength of the black and white effect. When the strength is on 0, there is no effect and the other sliders are hidden. Increasing it to 1 reduces the strength of the colors. When at 1, the image is Black and White.

Exclude – Excludes one area of the picture from the Black & White or Sepia adjustment. For example, leaving one building in color and the remainder Black & White.

Blacks – Blocks of color to adjust the shade of the Blacks in the image. When a block is selected, additional sliders appear to adjust the exact color selected.

Midtones – Blocks of color to adjust the shade of the Mid tones in the image. When a block is selected, additional sliders appear to adjust the exact color selected.

Whites – Blocks of color to adjust the shade of the Whites in the image. When a block is selected, additional sliders appear to adjust the exact color selected.

Vignette

Opacity – Adjusts the intensity of the vignette. When at 0 there is no effect and the other sliders are hidden.

Radius – Adjusts the size of the vignette around the image.

Outer Color – Blocks of color to adjust the color of the vignette in the image. When a block is selected, additional sliders appear to adjust the exact color selected.

Reset Section and Save Preset

At the bottom of each section are the buttons for Reset Section and Save Preset.

Save a preset for future use by clicking Save Preset. This opens a box to type a preset name. Click OK to save it as a Preset in that section. Click Cancel to exit the Save Preset box.

Click Reset Section to revert all slider values to 0, undoing all of your changes to that section.

Tip: Toggling the power symbol to the right of a section heading lets you turn your changes on and off without permanently undoing them. This is useful if you want to review your edits.

Whole Picture

Shows a tab for Presets of changes made to the whole picture, and a tab for adjusting sliders to change the whole picture.

Main sliders

The first set of sliders are for quickly tweaking the overall brightness and colors in the image.

Top (Style) Slider – The first slider allows you to apply an overall color, brightness and contrast style to the whole image. The drop down box on the left lets you choose from different color, brightness and contrast styles. For instance, improver will detect what type of landscape you have and intelligently improve it. Other options let you apply the colors and shades of sunset or dusk for instance.

Style Contrast – This slider bellow lets you tweak how much change there is to the brightness and contrast from the style slider without affecting the colors. When it is at 0, only the hue and saturation of the pixels will be changed, when it is at 1 the brightness of the pixels will be changed to the maximum amount specified by the style slider.

Hi/Low Key – When set to 1, it will turn the image into a high key image, with generally bright colors and good contrast. When set to -1 it will turn the image into a low key image with generally dark colors and extreme contrast. At 0 it has no effect.

AutoWhite Balance – Automatically fix color cast in images.

Auto Levels – Automatically fix color cast and lack of contrast in image.

Flatten Histogram – Recover detail in image highlights, or blacked out shadows.

Exposure Recovery – Fixes over exposed areas, if there are any.

Exposure – Adjusts the exposure of all the image.

Fill Light – Used to brighten, especially in underexposed areas.

Blacks – Darkens the blacks in the area to make the image more punchy.

Color

Vibrance – Increases the intensity of colorful areas while grayer areas are changed less.

Saturation – Increases or decreases the intensity of all the colors in the image.

Colorfulness – Makes an image more colorful by increasing the intensity and range of colors.

Presence

Contrast – Adjusts the amount of difference between the light and dark area in the image.

Dehaze – Slide up to remove haze from the image and slider down to add haze. N.B. This slider works on the whole image at once as if the haze was all close up. If you have added labels to the image then there is another Dehaze slider in the Sky section that adds or removes haze from the sky and landscape dependent on depth from the camera to get more realistic results as if the haze were sitting in the landscape.

Manual White Balance

Temperature – Sliding to the right warms the image, making it more red, sliding to the left cools the image making it bluer.

Tint – Adjusts the tint of the image. Sliding to the right makes the image greener, to the left, more magenta.

Reset Section and Save Sliders

At the bottom of each section are the buttons for Reset Section, and Save Preset.

Save a preset for future use by clicking Save Preset. This opens a box to type a preset name. Click OK to save it as a Preset in that section. Click Cancel to exit the Save Preset box.

Click Reset Section to revert all slider values to 0, undoing all of your changes to that section.
Tip: Toggling the power symbol to the right of a section heading lets you turn your changes on and off without permanently undoing them. This is useful if you want to review your edits.

Selection Editing Tools

The Selection editing tools are available under the Add & Edit Areas section.

LandscapePro offers different editing options for different features in your image. The Selection tools are used to adjust the areas where the enhancements are made.

To begin selecting, drag and drop the appropriate labels (Sky, Water, Sand, etc.) onto features in your image. LandscapePro will automatically select the areas that have been labeled but depending on the picture you may want to refine these. The selection editing tools let you manually adjust these areas.

The selection editing tools are “smart” tools, in that they will automatically detect the edges of regions. Read the Pull tool first, it is the default tool and some of the other tools work in a similar way. Understanding each of the tools’ strengths is key to get great results with complex images.

The following tools are available:
Pull
Smart Brush
Soften
Expand

Tree & Sky
Object In Sky
Horizon Line
Reflection Edge

Side Panel Reference

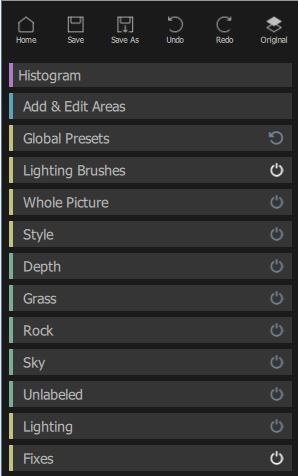
This section describes the main controls available when you are enhancing an image.


The main sections in the controls panel (in the screen-shot above) can be opened or closed by clicking on the header of each section.

Each section has a toggle on the right hand side, which shows if it has any effect . You can click on this button to temporarily disable a section (which will set sliders to zero to make it have no effect) and click again to enable it.   If you want to start again with a section, you can turn it off and start adjusting the sliders from that ‘clean state’.

A section is only displayed if it is needed. For example if there are no buildings in the picture then the Building section will not be shown.

The Histogram is only available in the Studio Max edition and is always shown at the top even if you scroll the rest of the sections.

Docking and Undocking the controls

You can undock and move the controls by dragging the gray rectangle at the top of the controls, then the control panel can be made longer or shorter by dragging the bottom edge of the control panel. You can re-dock the control panel on the left or right by dragging it all the way over to the left or right.  When the panel is undocked, it will fade out when you use the sliders.   That way you can adjust your image completely full screen with no distracting elements.

Flipping between the enhanced and original image

You can press the Enter key at any time to switch the enhanced image view to show the original image. The original image is only shown while you hold down the enter key.

This lets you flip between the enhanced and original image which is a great way to see the changes.

Alternatively, you can click and hold the mouse button down on the button that says Show Original.